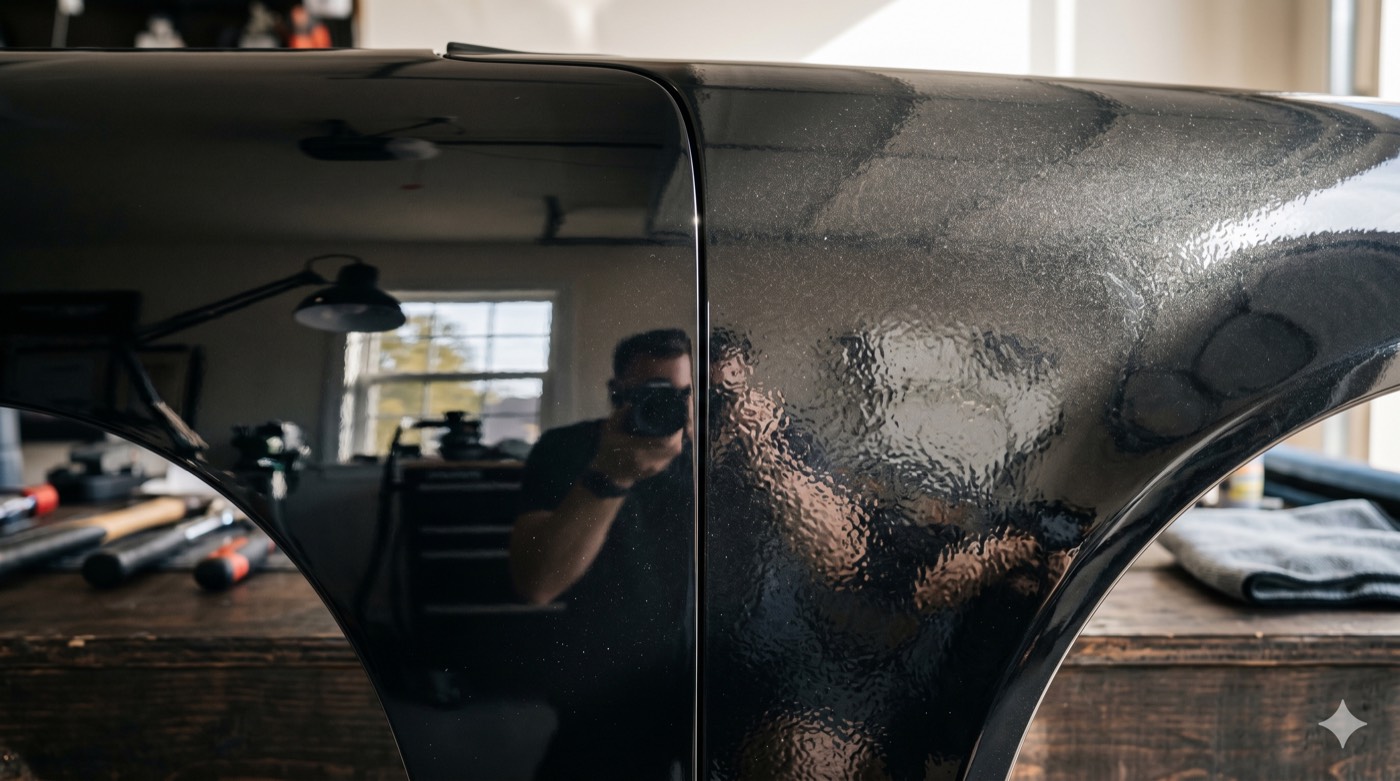
Orange peel is the most common reason a paint job looks "almost there" instead of finished. The color is right, the coverage is good, but the surface has that dimpled, citrus-skin texture that catches the light wrong. Customers notice it on the way out the door, and on the ASE B2 exam it shows up as a finish-defect question with four answers that all sound reasonable.
The good news: orange peel is one of the most controllable defects in the booth. It is almost always a setup or technique problem, which means once you understand what drives it, you can dial it out before it happens and buff it out when it has already cured. Here is how working painters do both.
What Orange Peel Actually Is
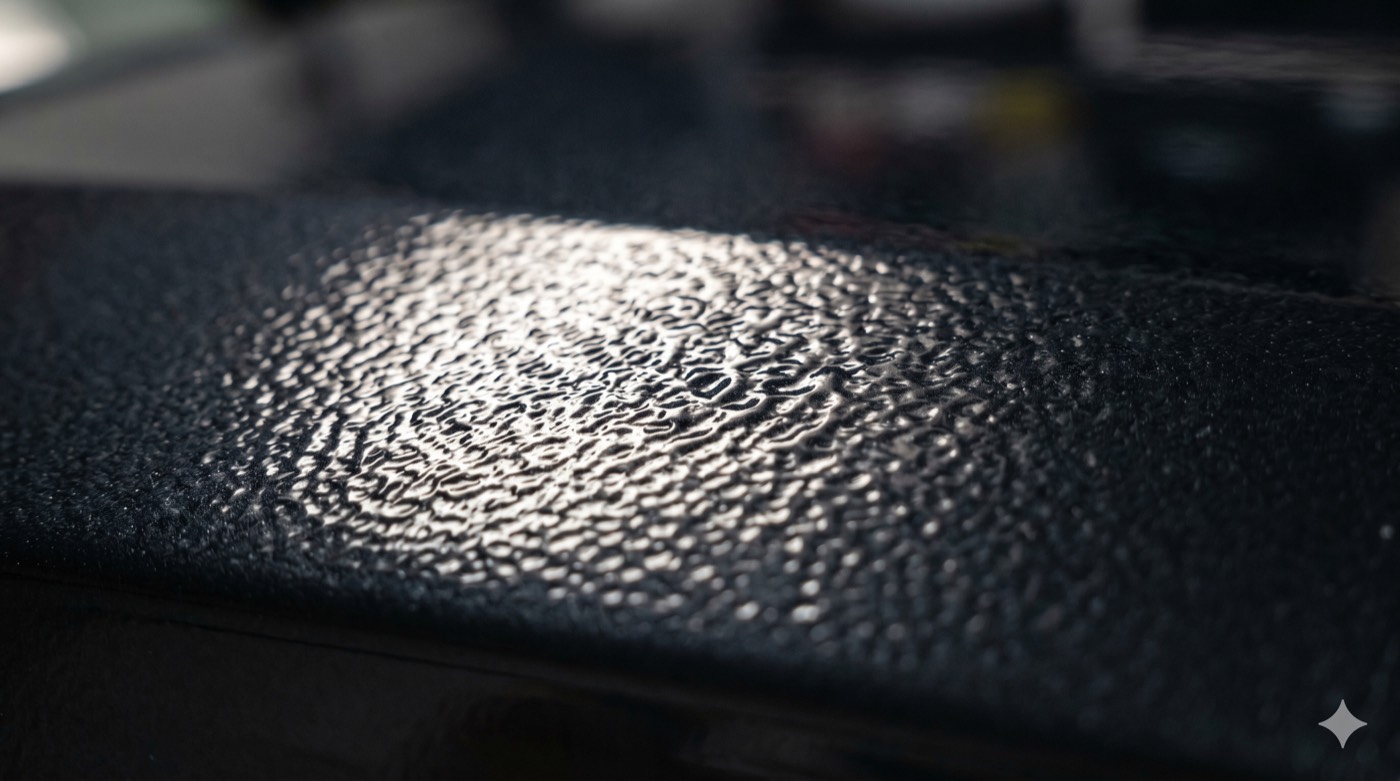
Paint leaves the gun as thousands of tiny droplets. After those droplets hit the panel, they need a moment to melt together and level into one smooth film before the solvent flashes off and the surface locks up. Orange peel is what you get when the paint flashes before it finishes leveling. The droplets freeze in place as little hills and valleys, and that frozen ripple is the texture you see and feel.
So every cause of orange peel comes back to the same question: did the paint have a chance to flow out, or did it set up too soon? Keep that in mind and the whole defect stops being mysterious.
What Causes Orange Peel
There is rarely one single cause. It is usually two or three of these stacking up:
- Atomization that is too coarse. Low air pressure at the cap, or a fluid tip that is too large for the material, throws bigger droplets that cannot level out.
- Material that is too thick. Paint mixed under the recommended reduction, or not reduced at all when the temperature calls for it, is too viscous to flow.
- Gun held too far away. The farther the gun is from the panel, the more solvent the droplets lose in flight. They land half-dry and never melt together.
- Reducer or hardener that is too fast. A fast reducer in a warm shop flashes before the film can level. Match the reducer or activator speed to the actual booth temperature, not the label's average.
- Moving too fast with too little overlap. Rushing the pass lays the film too thin and uneven to flow.
- Booth too hot or too much air movement. Excess heat and airflow pull solvent out early.
| ❌ Shop Shortcut That Causes Peel | ✅ What a Clean Finish Needs |
|---|---|
| "Bump the pressure down so it does not run." | Set cap pressure to the gun maker's spec so the material atomizes fine enough to level. |
| "Shoot it thick, one heavy coat, get it done." | Two or three properly reduced medium coats with full flash between them. |
| "Stand back so I do not get a sag." | Hold the gun 6 to 8 inches off the panel, perpendicular, so droplets land wet. |
| "Grab whatever reducer is on the shelf." | Match reducer and activator speed to the shop's actual temperature. |
| "Half overlap is close enough, keep moving." | 50 percent overlap, steady speed, wrist square to the surface. |
Dial It Out at the Gun
Prevention beats correction every time, because buffing burns labor hours and clear coat film you cannot get back. Before you pull the trigger on the real panel, set up for flow:
Pressure. Set your air pressure to the gun manufacturer's specification at the cap, with the trigger pulled, using the gun's own gauge or an inline regulator. Guessing at the wall regulator is how peel sneaks in, because line loss drops your real pressure at the gun.
Reduction and viscosity. Mix to the published technical data sheet ratio with a measuring stick or a scale, not by eye. If the TDS gives a temperature range for reducer speed, pick the speed for the booth you are standing in today.
Distance and angle. Keep the gun 6 to 8 inches off the surface and perpendicular to it. Arcing your wrist at the ends of a pass changes the distance and bakes peel into the edges of the panel.
Coats and flash. Lay medium, wet coats and give each one its full flash time before the next. A rushed recoat traps solvent and ruins leveling.
Pro tip: shoot a test panel or a scrap door skin with the exact mix, pressure, and reducer you are about to use on the car. Thirty seconds of setup on a test panel saves an hour of color sanding later, and it is the single habit that separates painters who buff every job from painters who almost never do.
For more on matching your materials to the job, our guides on solvent versus waterborne paints and choosing a waterborne basecoat walk through how product choice changes your flash and flow window.
Fixing Orange Peel That Has Already Cured
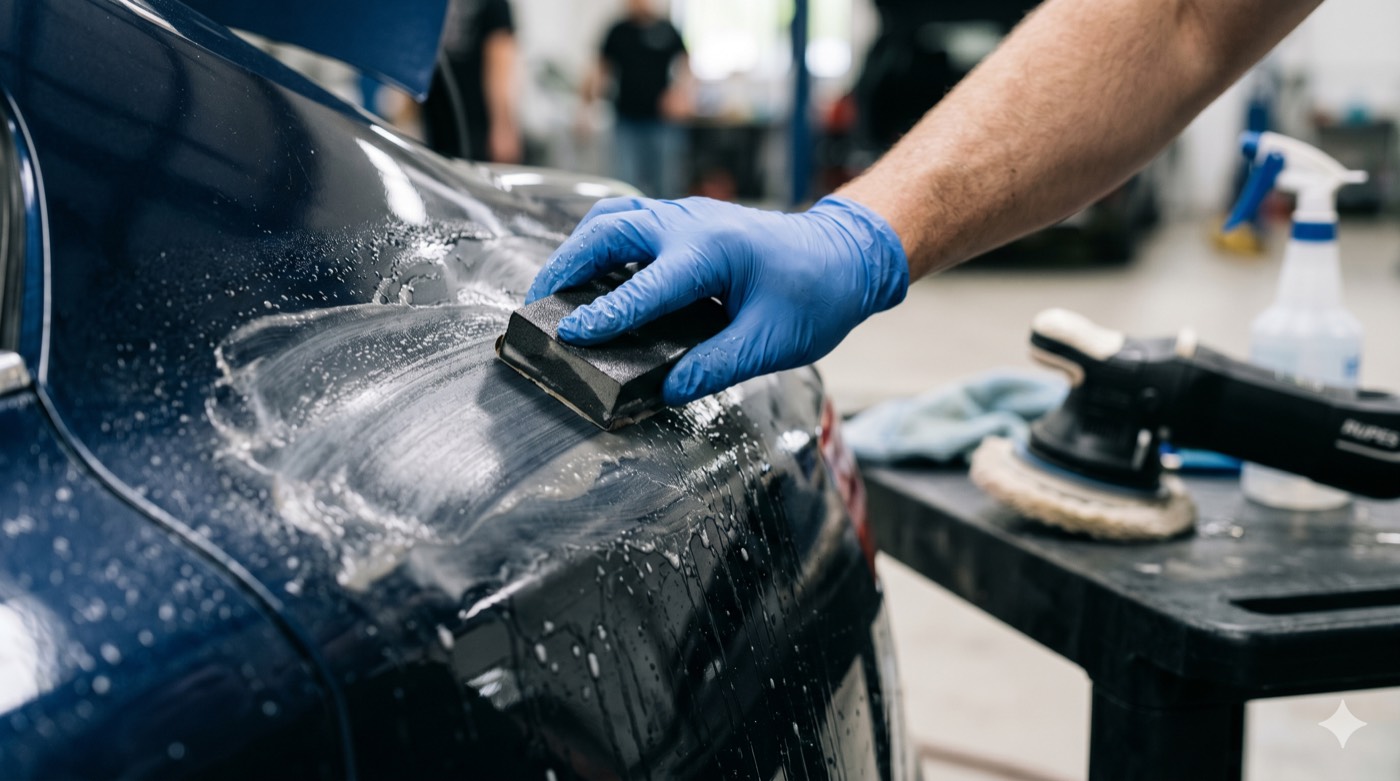
If the clear is already on and cured and the texture is too heavy to live with, you correct it by leveling the surface and bringing the gloss back. This is the classic color sand and buff:
- Let it cure fully. Sanding soft clear loads your paper, drags, and leaves marks that show up days later as die-back. Give it the recommended cure, or bake it.
- Wet sand the peel flat. Start around 1200 or 1500 grit on a hard backing block or pad, with plenty of water and a drop of soap. The block is what cuts the high spots and leaves the valleys, so the surface goes flat. Sanding by hand with no block just follows the peel.
- Refine the scratch. Step up to 2000, then 3000 grit. Each step only needs to remove the scratches from the step before it. Keep the surface wet and rinse your paper often.
- Compound. Use a cutting compound with a wool or foam cutting pad to remove the 3000 scratch and bring back the shine.
- Polish and finish. Follow with a finishing polish and a soft pad to clear up any compound haze or swirl, then wipe down and inspect under good light.
Watch your film build. Every pass of sandpaper and every cut with compound removes clear coat. Modern clear is often only a couple of mils thick. If you sand through to the color coat, there is no fixing it with polish, you are repainting. When in doubt, measure with a paint thickness gauge before you start cutting.
Reshoot or Buff? Make the Call Early
Not every orange peel job should be buffed. Use this rule of thumb:
- Buff it when the texture is light to medium, it lives in a clear coat with healthy film thickness, and the panel is otherwise clean. This is faster and cheaper than a redo.
- Reshoot it when the peel is heavy, the texture is in the color coat rather than the clear, the clear is already thin, or there are other defects (dirt nibs, solvent pop) you would have to fix anyway. Sanding deep peel flat often takes more clear than you have.
Matching factory texture matters too. Almost every production car wears a light, uniform peel from the factory e-coat and robotic spray. If you buff a repaired panel dead flat next to factory-textured panels, the repair stands out as too glassy. Good refinish work blends the repair to the texture around it, not to a mirror.
If you want a full rundown of the other defects that share a booth with orange peel, our refinishing defects cheat sheet covers fish eyes, solvent pop, die-back, and the rest, with the cause and the fix for each.
Why This Shows Up on the ASE B2
The ASE B2 Painting and Refinishing exam leans hard on application and finish defects, and orange peel is a favorite. The trap questions pair a plausible shop habit against the textbook-correct cause, and the wrong answers are written to sound like things you have heard around the shop. If your instinct is "turn the pressure down," the test wants to know whether you understand that coarse atomization, not pressure by itself, is what froze the texture in place.
Knowing the real mechanism, that the film flashed before it leveled, is what lets you pick the right answer under time pressure instead of guessing between two answers that both feel familiar. That is exactly the kind of reasoning our ASE B2 module drills, with practice questions written in the real exam format and explanations that connect the booth to the textbook.
ASE Certified
Collision Technician
The ASE Collision Technician patch, the credential that proves you have mastered the craft. Passing exams like the ASE B2 Painting and Refinishing is a key step on the path to earning it.
ASE®, the ASE logo, and "ASE Certified" are registered trademarks of the National Institute for Automotive Service Excellence. asecollisiontestprep.com is not affiliated with, endorsed by, or sponsored by ASE.
Stop Guessing. Start Passing.
Orange peel is a flow problem, and the ASE B2 is full of defect questions just like it. The fastest way to walk in confident is to drill the real question format until the textbook-correct answer is automatic. That is what we built.
Choose Your ASE B2 Access
One-time payment. No subscriptions and no recurring fees, ever.
- Prometric-style exam simulator
- 1000+ practice questions
- Digital flashcards
- Weakness drills
- Web or mobile access
- Everything in Simulator Access
- Full ASE Academy lesson course
- Step-by-step guided study path
- Hands-on labs and key-term training
The Simulator is available now; the ASE Academy bundle is launching soon. All sales are final.


Discussion
Join the discussion — sign in to comment.
Comments are reserved for registered students and technicians. Your name will be pulled from your profile automatically.
Log In Register